
Well, it's finally happened. For the holidays, I received a box of boyz and two boxes of grotz. The grotz are all assembled, as are the runtherdz for the most part. But, when I was thinking about what to do with the boyz, I started thinking of Da WAAAGH and everything that's been said on it with regards to tactics. I'm a firm believer in getting as much out of a box of GW minis as I can so I took count of the models that can be made. With the addition of two legs (which you can purchase from Battlewagon Bitz) you can get 10 regular boyz, 1 big shoota boy and one rokkit launcha boy along with one nob. This puts me on my way to a Tank Busta mob, as well. So I got this far in putting them together.
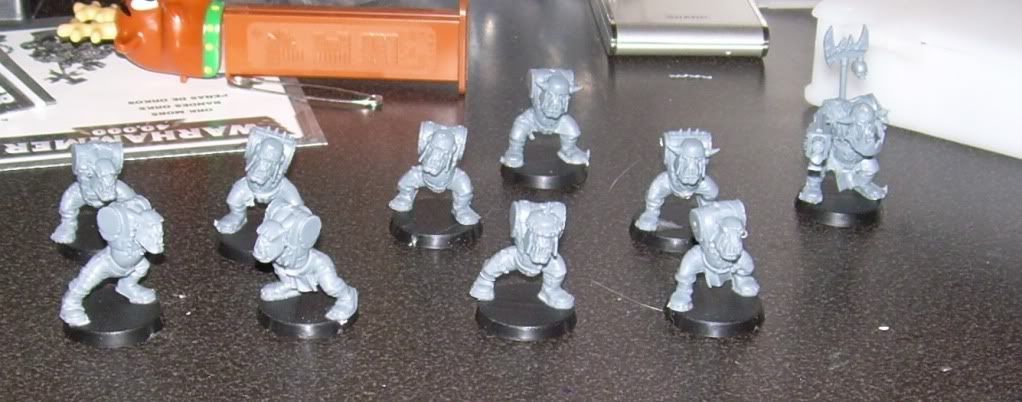
When I came to a point where many people ask themselves an important question, "should I go shoota boyz or slugga boyz?" I answered that question long ago with "Why not both?" So here's what I did.
Materials Required:
Pin Vice Drill
Dremmel Tool
0.125" diameter x 0.03125" depth rare earth magnets (from here)
Super Glue
Patience
First step was to take my pin vice drill and drill a hole directly in the center of both of the shoulders. It doesn't need to be deep, it's only to act as a guide for the bigger bit.

Then, I take the rounded bit from my dremmel tool and went in about 0.03125'' deep (about half way up the round part of the bit, if not a little more).

After that's rounded out, I take the cylindrical bit (I do apologize for not knowing the actual names of these things) and drilled straight into it, squaring off the curved bowl-shape so it's a cylindrical hole. Again, you can go a little deeper than 0.03125'' on this one.

Now, after blowing/filing the little grindy plastic bitz from the hole, we get into the fun stuff. Test to make sure your fiddly rare earth magnet will fit in the hole. And when I say fiddly, I mean fiddly.

It has to fit flush with the body, but it's ok if it sinks in a little bit. The magnet is strong enough to hold. Once you get it in flush, take it out and put just a tiny little drop of super glue and then put the magnet back in.

Important note: However you do your magnetic polarities, make sure you are consistent. You cannot expect the final project to work if some of your boyz shoulders are North and North, some are South and South and some are North and South polarities. The way I got around this was by keeping my magnets in a stack. I then inserted the top magnet in the stack into the shoulder hole and slid the stack to the side. This is the easiest way to break the hold of a magnet. It also leaves the top magnet in the hold for easy testing. When you are satisfied that it is flush, put the top of the magnet stack back against the magnet and pull directly away from the shoulder. This will pull the magnet out after one or two tries.
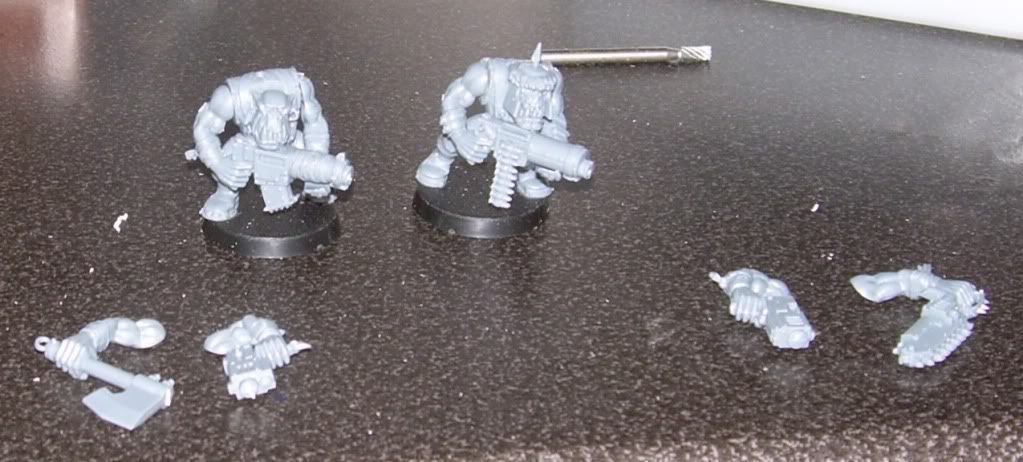
Ok, now that you have your shoulders properly magnetized, it's time for the harder part. Da Armz. Essentially the process is the same. First step again is to drill some guide holes in the center of the shoulders. I'd recommend starting with the shootaz because those are the ones that have to match up with each other in order to actually hold the gun.

Important note: The shoulders are quite thin compared to the body you just drilled and magnetized. While you had room for error in the drilling depth on your bodies, you do not have that on your arms. I, myself, have drilled through two shoulders all the way. I'm just glad I have bitz to cover the holes. Some green stuff putty should also work, too.
Once you've drilled the guide hole, shave out the shoulder some with the roundy bit.

And then the cylindrical bit.

Due to the thin nature of the shoulders, you may need to go back a few times to get the depth a bit right. Remember, you can always drill more, but you can't drill less. Don't be afraid to revisit the shoulders more than once if you find it isn't deep enough.
Then you test the magnets to see if they are flush. Once they are, glue them in.

Important note: While I tested the fit of the holes in the arms the same way I did with the shoulders, when putting the magnets into the arms, I did so individually with my fingers. The reason was that if I had done them in the same process as the shoulders, I'd have been putting opposing poles toward each other and it would have ruined the project. I did put one of my body magnets in backwards, but that was easy to fix, by drilling next to it and prying it out with a safety pin. You can't do that with the arms. So please, please, please don't mix up the polarities. Like crossing the streams, it could be bad.
Now, once you have the magnets tested and glued in, repeat the whole process for all your shoota arms and slugga/choppa arms. The result is having 10 shoota boyz
or 10 slugga boyz.

This process is also helpful if you plan on playing any Gorkamorka (which I might start up this summer) or if you're going to be making Kommandoz and want to dual-wield sluggaz or choppaz.
Now, with the Nob, I went ahead and glued on the Slugga arm, because he'll always have that, but I drilled out his raised shoulder and fitted a magnet into it as well.

This gives me maximum freedom for having a Power Klaw

Or a choppa.

More to come with next paycheck.
thats pretty cool toys yeah
ReplyDeletehttp://gmhaha.blogspot.com/
helpmehelpyou
Nice pictures and post, keep it up
ReplyDeletewhat is this i dont even
ReplyDeleteprotipzdaily.blogspot.com
damn, this looks like massive work. WAAARGGHHH. i'm following you, mate.
ReplyDeleteyou can check out my blog if you want to.
http://grizzgehtbloggen.blogspot.com/